


The One with the Simon Says Stamp Rainbows Release Blog Hop Day 2
- Koren Wiskman
- Jun 5, 2021
- 3 min read


Hello everyone.
Today is day two of the Simon Says Stamp Rainbow Release Blog Hop. I have two card projects to share with you today. I use the NEW Slimline Waves stencil to create the backgrounds on both. I love the way these cards turned out. Keep scrolling to read more about them.
To check out the entire Rainbows release from Simon Says Stamp (CLICK HERE!). You will find all of the latest product as well as inspiration on how to use these products over on the blog.
Use code ENVIES at checkout to receive a free pack of holographic envelopes with your purchase. This promotion expires 6/6 at 11:59 pm EDT
GIVEAWAY
A $25 coupon is going to be given away at each stop along the hop today so make sure you comment for your chance to win. A winner will be chosen on Wednesday, the 9th of June and announced over on the Simon Says Stamp blog.
Scroll down to find a complete list of bloggers participating in today's hop. The more blogs you visit, and comment, the greater your chances of winning. Good Luck!
I love the way these cards turned out. Keep scrolling to read more about them.

Background:
No.1 I ink blended both background panels using a combination of Distress Oxide inks by Ranger. Both panels are cut to 4 3/4 by 3 1/2 inches. This blue one was created using Chipped Sapphire, Cracked Pistachio, and Evergreen Bough. I did also use Ranger's Picket Fence white pigment ink to blend the very top of this panel into the Evergreen Bough.
For this background I left the stencil in place the entire time. This preserves the cardstock underneath to be bright white.
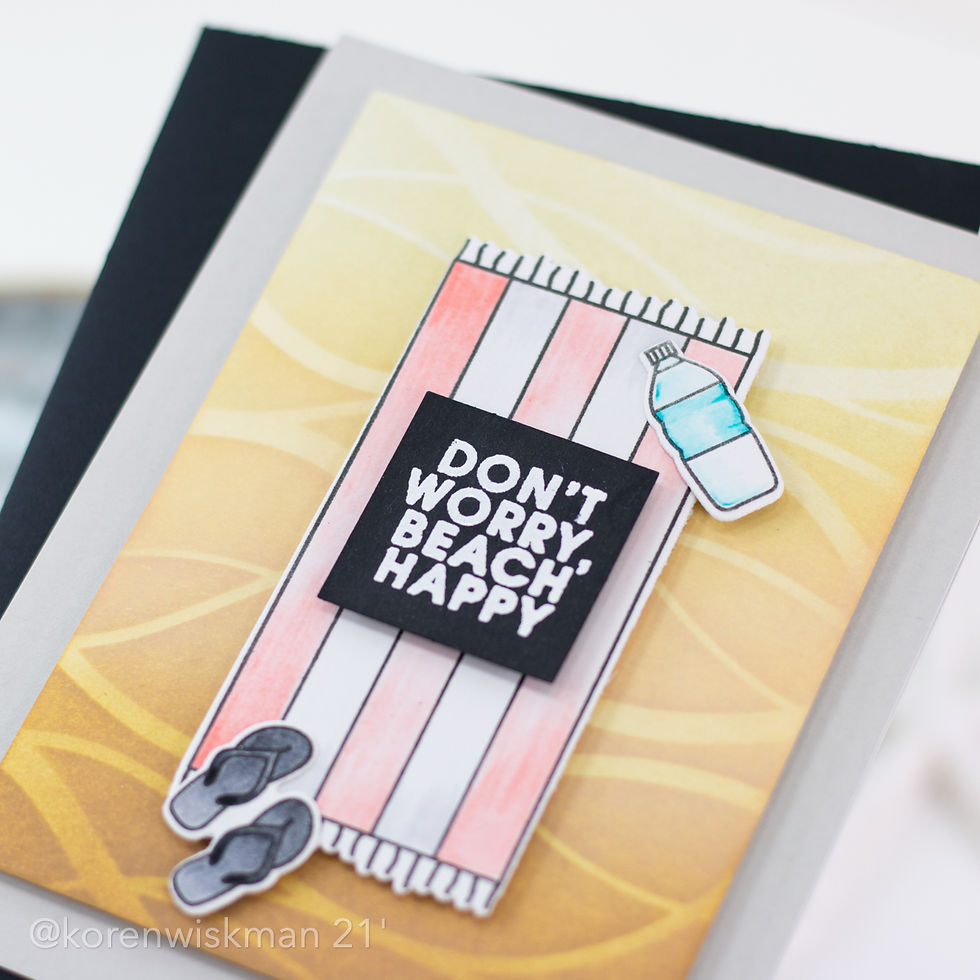
No. 2 My intention for this background was to create a sandy beach for my images to be on. To do this I used Brushed Corduroy, Antique Linen, and Old Paper to create this sandy background. Both backgrounds were blended using Ranger's ink blending tools.
For this background I removed the stencil and then went back over the entire panel again with the same inks to fade the bright white lines left from the stencil.

I did also post a video this week using some of the products from the NEW Rainbows release. If you don't see the video linked below (CLICK HERE!) to watch.
Images:
No. 2 I stamped my images using Simon Says Stamp Intense black ink and heat set it quickly with my heat tool. I then used Inktense Pencils to lightly color my images .
Sentiment:
No. 2 I stamped the "don't worry, beach happy" sentiment from the Beach Beauties Stamp set using watermark ink and I heat embossed it using Simon's detail white embossing powder. I then trimmed it into a square.
No. 1 I stamped the "a little note" sentiment from the Just Because Word Mix 2 stamp set. This is one of my favorite sentiments from SSS. I stamped it with Versafine Clair Nocturne ink. This stamp set is designed to stamp a bunch of sentiments at one time, but I've cut this sentiment away from the rest because I love using it so much. I usually use one of my circle die to cut it out.

Assembly:
No. 1 Both of the card panels I'm using today were cut down to 4 3/4 by 3 1/2 and added to an A2 size top folding card base made from Simon Says Stamp Fog cardstock. They were also added using craft foam and tear tape adhesive to pop them up. The "a little note" sentiment was also popped up on top using foam squares.
No. 2 The beach towel was popped up onto the sand using foam squares. Then I added the water bottle and the flip flops using liquid adhesive, adhering it directly to the towel. The sentiment square was then popped up using the same type of foam squares.

Blog Hop Participants
I hope that I've inspired you to create something today. If you haven't already (CLICK HERE!) to visit Simon Says Stamp and check out their NEW Rainbows release.
Thank you so much for stoping by my blog today,


Caliber: 4309 (41mm), 5909 (37mm)Functions: Hours, minutes, and centre secondsDiameter: 32mm and 26.2mmThickness: 4.9mm and link 4mmPower Reserve: 70 hours and 60 hours Winding: SelfwindingFrequency: 4 hz 28,800 vphJewels: link 32 link + 39
In terms of structure, we will first break the watch down into four main categories, representing its production timeline. link There are four main variations which carry the 14270 through its production link run and, as discussed above, each one will be given a shorthand name to link aid in its identification.
wow, absolutely gorgeous!
Love your card, the blue one is so pretty
Love the “little note“ card. Beautiful blues.